command ee.zip.extractArchive pArchive, pWhere
   local tZipContents
   local tFolderPath

   -- open archive and read items
   revZipOpenArchive pArchive, "read"
   put revZipEnumerateItems(pArchive) into tZipContents

   -- get rid of the last slash if there is one
   if the last char of pWhere is slash then
      delete the last char of pWhere
   end if

   -- loop through the zip content, create folders and files
   repeat for each line ll in tZipContents
      if the last char of ll is slash then --> the last item is a directory
         put ll into tFolderPath
         -- create folders
         _ee.zip.createFolders tFolderPath, pWhere
      else --> the last item is a file
         set the itemDel to slash
         put item 1 to -2 of ll into tFolderPath
         -- create folders
         _ee.zip.createFolders tFolderPath, pWhere
         -- extract file
         revZipExtractItemToFile pArchive, ll, (pWhere & slash & ll)
      end if
   end repeat
end ee.zip.extractArchive

private command _ee.zip.createFolders  pPath, pWhere
   local tFullPath

   split pPath by slash
   put empty into tFullPath
   repeat for each element ee in pPath
      put ee & slash after tFullPath
      create folder (pWhere & slash & tFullPath)
   end repeat
end _ee.zip.createFoldersLiveCode Blog
Sunday, September 20, 2015
Extract zip archive with folders in Livecode
Creating a password field with Livecode
You may have come to the point where you required a password field and thought: How on earth can I do that with a normal text field in Livecode.
Well, it's actually really easy.
Step 1: Import an image
You can check here how to import an image into Livecode. Most likely you want to download a black dot as image.
Step 2: Add code to the text field
Once you've imported the image you can see the id of the image by using the property inspector. Copy the code snippet from below and replace the image id with the id of your image.
on textChanged
  local tImageId

  -- the id of an image that you've imported (you need to change this)
  put 2764 into tImageId

  repeat with x = 1 to the number of chars of me
     set the imageSource of char x of me to tImageId
  end repeat
end textChanged
That's it! So now when you type something in to the text field, you'll see the image instead of the character.
Livecode repeat structure examples
Loop through controls
repeat with c = 1 to the number of controls of card X
  put the name of control c
end repeat
Loop through array keys
repeat for each key k in tArray
  put "Key: " & k & " - Value: " & tArray[k]
end repeat
Loop through array elements only
repeat for each element e in tArray
  put e
end repeat
Loop until an amount is reached
repeat with tVarNum = 1 to 20
  --do whatever
end repeat
Loop through each line
repeat for each line l in tVar
  put l
end repeatInstalling Android for Livecode
Pre-conditions
This tutorial is written for LiveCode 6.6.2 stable and may not work with other releases. This document will not be updated.
This Video by a member of LiveCode may help also to implement Android SDK with LiveCode.
Install Java JDK 7
Many systems will have the JDK installed already. If you don't have JDK installed you can download it over the here.
Install Android SDK
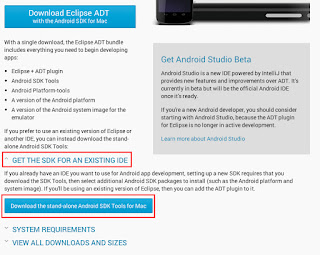
Click you can download the Android SDK from here. Don't download the Eclipse ADT as it contains the Eclipse editor which you don't need if you use LiveCode. Download the Standalone Android SDK Tools. In my case I download it for Mac. You can install the SDK in any directory you like. I usually create a directory called SDK in to my user directory and move all SDKs into there.
After the Android SDK has been installed Android has to be configured over the android application in the tools folder.
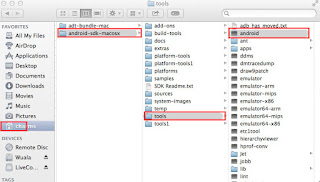
After double clicking the android application you'll see the following screen below:
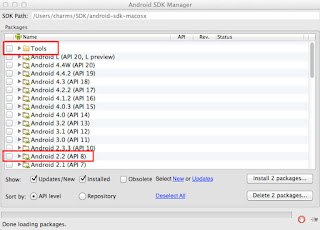
You need to install at least the "Tools" and "Android 2.2 Froyo" packages. It is recommended to install all the Android target platforms for which you would like to build. So you would also tick "Android 4.4.2" if you would want to install your app on to the "Android 4.4.2 target system".
Create a virtual device
You can create a virtual android device with which you can test your applications. You have to note however that this is incredibly slow as Android does not use an Emulator but is loading a whole operating system in a virtual machine. So the preferred way to test is by using a physical Android device or the IOS emulator to test the basic mobile functionality. If you however don't have a physical device and need to test your application on Android then a virtual device can be used. In the Android application choose "Tools" -> "Manage AVDs".
To create a new virtual device click on to the "New" button.
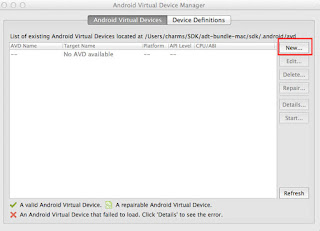
Next you can specify what device you want to create. To start with I've created a tablet device.
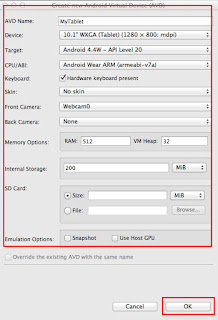
After that you can start the virtual device. Please note that this will take several minutes.
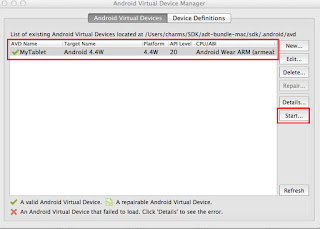
Configure LiveCode
In LiveCode click on to "Preferences" -> "Mobile Support". Then you can choose the path to the Android SDK. In case you get a message that the Android SDK path is not valid it is possible that you forgot to install the "Tools" or "Android 2.2" packages or then you use an Android Version which is not supported. As LiveCode is always a step behind the SDK and needs to upgrade the code again when Google made changes to the SDK it is possible that you need to use an older version. See this post for details.
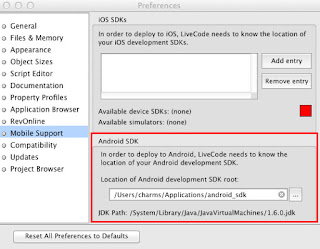
Once this is done you configure the Standalone Settings.
Downgrading the Android SDK to a previous version
There is no straight forward way. Google does hide the older versions of the tools package. It is however possible to download an older version. I've found a way over this stackoverflow entry.
To find the old tools, you need to determine the SDK version number that you want to revert to. On the Google Android SDK webpage, you will find a Revisions list that shows all the SDK numbers, e.g.
- SDK Tools, Revision 22.6.2 (March 2014)
- SDK Tools, Revision 22.3 (October 2013)
- etc.
Make a note of the exact revision number, like "22.3".
Now download the tools by using the following pattern:
- http://dl-ssl.google.com/android/repository/tools_rXXX-windows.zip
- http://dl-ssl.google.com/android/repository/tools_rXXX-linux.zip
- http://dl-ssl.google.com/android/repository/tools_rXXX-macosx.zip
Once you download the file and unzip it, you will find a single folder called 'tools'. Now replace your android-sdk/tools folder with this new one. Once this is complete you can double click the "android" application and follow the steps above.
Larger Livecode Projects
Pre-Conditions
This tutorial is written for LiveCode 6.6.2 stable and may not work with other releases. This document will not be updated.
Distributing work to different developers
When working in larger teams you might want to distribute work to different developers. If you have only one stack file then you'll encounter the problem that the stackfile will be locked by one developer and during that time the other developers can't work on the stack.
A solution for this issue is to let the developers develop their own stacks for the functionality they have to provide. They build their own functional stacks which will be then glued together as substacks in to one main stack.
It is possible to glue together stacks through the stackFiles property. In the below example i've created following files:
- mainstack.livecode
- parts/part1.livecode
- parts/part2.livecode
In part1.livecode I've added following command:
on part1HelloWorld
  answer "Part1: Hello World"
end part1HelloWorld
In part2.livecode I've added following command:
on part2HelloWorld
  answer "Part2: Hello World"
end part2HelloWorld
Then I've written following code to load the stacks in to the mainstack.livecode file:
on preOpenStack
   local tStackFiles

   put "part1,parts/part1.livecode" & cr into tStackFiles
   put "part2,parts/part2.livecode" after tStackFiles

   set the stackFiles of this stack to tStackFiles
end preOpenStack

on openStack
   start using stack "part1"
   start using stack "part2"
   part1HelloWorld
   part2HelloWorld
end openStack
As you can see above you'll have to load each stack with the short name of the stack, a comma and the path relative to the main stack. "the stackFiles" requires that you load each stack on a single line.
If you need the substacks to interact with each other you can define global variables that can be set or you can define commands or functions that can be executed in each part that can be executed globally. You should be able to execute all commands and functions as long they were not specified as "private".
Working with Arrays
Pre-Conditions
This tutorial is written for LiveCode 6.6.2 stable and may not work with other releases. This document will not be updated.
Working with Arrays
Create a one dimensional array
put empty into myArray
put 1 into myArray["id"]
put "Herbert" into myArray["name"]
Create a two dimensional array
put empty into myArray
put 1 into myArray[1]["id"]
put "Herbert" into myArray[1]["name"]

put 2 into myArray[2]["id"]
put "James" into myArray[2]["name"]
Find the number of elements in an Array
put the number of lines of (the keys of myArray)Push a value on to the end of an Array
put "value1" into myArray[the last line of the keys of myArray + 1]
put "value2" into myArray[the last line of the keys of myArray + 1]
put "value3" into myArray[the last line of the keys of myArray + 1]
Delete an element from an Array
delete variable myArray["myKey"]Delete the value/contents of an array
put empty into myArray["myKey"]Sort the keys of an array
put the keys of myArray into myKeys
sort lines of myKeys
repeat for each line myKey in myKeys
  -- do something with myArray[myKey]
end repeat
Shuffle the keys of an array
put the keys of myArray into myList
repeat number of lines of myList
  put random(number of lines of myList) into myKeyNr
  put line myKeyNr of myList & cr after myNewList
  delete line myKeyNr of myList
end repeat
Loop through an array by key
repeat  for each key tKey in myArray
  put "Key: " & tKey & ", Value: " & myArray[tKey]
end repeat
Loop through an array by value
repeat for each element tElem in myArray
  put tElem
end repeat
Debug the output of an Array
function displayArrayData pArray, pIndent
  -- create the variable that loops through the keys in the array
  local tKey
  if pArray is an array then
    -- print information to indicate that we are entering a new nested level of the array
    get "Array" & return
    -- print full stops that allow the reader to track the depth of an element
    put "." after pIndent
    -- create the indentation
    put tab after pIndent
    repeat for each key tKey in pArray
      -- call displayArrayData with a nested array
      put format("%s[%s] => %s\n", pIndent, tKey, displayArrayData (pArray[tKey], pIndent)) after it
    end repeat
    delete the last char of it
    return it
  else
    return pArray
  end if
end displayArrayData
Look at the official LiveCode Documentation for more details about this function.
Sunday, July 27, 2014
Working with Library Stacks
Pre-Conditions
This tutorial is written explicitly for LiveCode 6.6.2 Stable and might not work with other versions. The tutorial will not be updated!
Using Mainstacks as Libraries
When you work on a large Livecode project you'll want to include libraries that contain re-usable commands and functions. You can do this by adding a mainstack to your project as substack. This is neat but when an update has been added to the library stack you'll have to delete the Substack and add it again.
The better solution is to load the libraries in as Mainstacks. This way each time you open your stack the library stacks will be loaded on demand. The Mainstacks will only be loaded if you have loaded them using the "start using" command. Otherwise they'll not be loaded.
To tell the Mainstack to load in other Mainstacks as libraries open the Property Inspector of the Mainstack and choose Stack Files. Click on to the small folder icon to choose Mainstacks that should be loaded if you open your stack.
Once you've added the stack files you can load them with the the start using command:
on preOpenStack
  start using "LibJson"
  start using "LibUuid"
  start using "GenericCouchDb"
end preOpenStack
Once you've loaded the Mainstacks with the start using commands and re-open your stack you'll see that the other stack files are loaded in automatically:
Including the stacks in to your application when building
The above works nice in development mode. But you'll also have to make sure that the stacks are built in to your standalone application. To do this you'll have to copy the files in to your application folder.Click on to File -> Standalone Application Settings -> Copy Files
If all the files are in a lib directory for example you can choose Add Folder and choose the lib folder. But you can also add single stack files by clicking on to Add File.
Using relative paths
If you want to open the stacks from a relative directory as for example ../lib you will have to load the stacks over script.
put the effective filename of this stack into tPath
set the itemDel to slash
delete the last item of tPath -- deleting the stack file name
delete the last item of tPath -- deleting the folder the stack is in
put tPath & "/lib" into tPath
set the defaultFolder to tPath -- sets the default folder to the new path

open stack "YourStack.livecode"
start using "YourStack"
As an alternative you can use following command:
set the stackFiles of this stack to "My Dialog,Custom Dialogs.rev,..."